Pages

Tuesday, September 11, 2012

DIY: Tassle Love (Part I)


I read this post months ago, and over the summer decided to try it out. However, before I could try out the necklace (which I will post tomorrow, since I did things a little differently), I had to make me some tassels!

I headed to Jo Ann's and more or less went hog wild, coming up with countless combinations of ombre (and metallic as seen above and below..) of tassels. Of course, I had to pare it down, which I did do... to five combos. Casual.

When I got back home, I took the embroidery floss, a piece of cardboard the size of a Post-It note, and some scissors and headed down to the beach to soak up the sun and whip out some tassels. I'm not going to lie, it was a little tricky at first, but quickly became a cathartic process. I know, I'm weird.

Sidebar: Remember when I wanted to make {this}? Well, now I know how to make all of the tassels! I have yet to accomplish punching grommets, and I still need to make a field trip to Mood to pick up some sturdy canvas (there wasn't anything of the sort in Jo Ann's), but that will be Christmas break's project.

Anyhow, here's how you can make your own tassels to do just about anything with! (I already have a mental list of bracelets, earrings, blankets, camera straps, pillows, etc!!)


You Will Need:

1 skein of embroidery floss per tassel
Cardboard cut to the size of a post it
Scissors

{I promise this is easy}

To Do:

1. Cut two pieces of embroidery floss, one about 4-5 inches, and one about 8 inches. Put these aside, you'll need them in a bit.
2. Wrap the rest of the skein around the cardboard until the skein ends.
3. Slowly and carefully wiggle the floss off of the cardboard.
4. Taking the smaller piece of floss, tie a knot around the center of bundle. Snip the loops on both ends.
5. Fold the bundle over and wrap the longer piece of floss around the tassel consistently, then knot it.
6. Trim the tassel and you're done!

You'll end up with a few of these:

pink!
jade
blues 
brass-gold


Enjoy!


*Unless otherwise noted, all pictures are property of Splash of Color & if used, please cite!

Monday, September 10, 2012

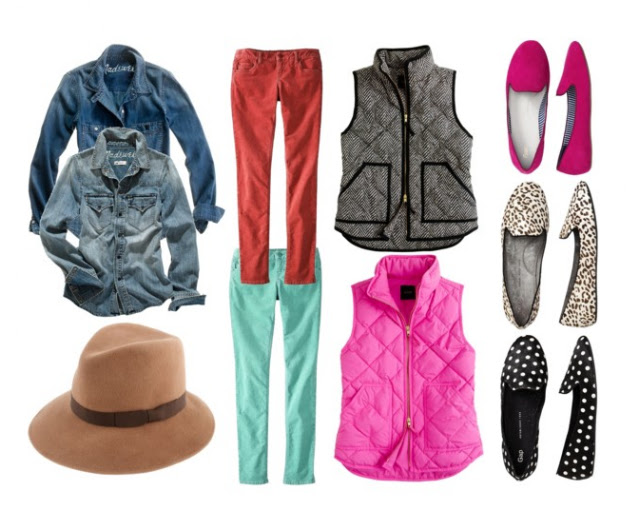
Fall Fashion Favorites

I love summer. I really, really love summer.

That being said, if I can't be sitting on the beach, and I must move on, then I would prefer if it started to cool down! Sweaters! Vests! Boots! Bring them on!

These are just a few of the items I am craving...


Denim shirts ~ Madewell
Hat ~ J.Crew
Vests ~ J. Crew
Cords ~ Target (can you imagine??)
Loafers ~ GAP (and I want them all. now, please.)

Friday, September 7, 2012

Friday's Fancies: Back to School

I mentioned last week that last Monday was my last first day of school (for the fall, anyways!), so this Friday's Fancies was perfect! I picked something slightly dressier, since this semester I am interning at a museum two mornings a week, so those two days I tend to come to class looking like quite the professional! :)

Here's what I would love to wear!

Top ~ TopShop
Cords~ J. Crew
Leopard Pumps~ J. Crew Collection

I am loving peplum tops. For my height (and lack of waist), they are perfect for defining the figure. I also cannot appropriately express my love for J. Crew corduroys, and this color is phenomenal- I saw them in J. Crew last week and almost died of happiness for fall fashion being upon us. Leopard is pretty much self-explanatory. Everything is better when leopard print! 

last first day!

Have a fabulous weekend!

Thursday, September 6, 2012

Happy Menocal

Despite my tendency to lean towards the classic, preppy, and leopard print details in fashion and interior design, my weakness is most definitely the "perfectly imperfect" and funky design aesthetic.

The latest designer to join the "how are you so fabulous slash I want your life" club is the artist Happy Menocal, most recently featured in the September issue of my {online bible}. 

{source}
I would die a thousand deaths for the lobster print on her home page! 

Here are a few other faves!!

{found here}


{visit me here}

You can visit the whole portfolio of work, as well as find information on Custom Heraldry (how fabulous that sounds) and Pet Portraits (Merry Christmas Mom....) {here} at Happy Menocal's site. Enjoy!

Wednesday, September 5, 2012

OBSESSED: SwellCaroline

Matchbook Magazine readers may recognize SwellCaroline from their ads in the fabulous online mag, but if you are not an obsessive reader who clicks on the links of literally every page of that mag and reads it front to back at least once a week, well, let me introduce ya!

{source}
I'm sorry, their own tagline is, "Addictive Costume Jewelry" .... how can one not be intrigued?

My Pinterest was quite literally invaded by my obsessive pinning of their beautiful baubles and addicting accessories {here}, but below are a few of my faves!

{buy me here!}

{click here to see more options}

{because everyone needs an monogram, find me here}

{i understand i'm a pretty fabulous belt. and i'm right here}


Seriously, these are only a few of the unbelievably affordable and fabulous options at SwellCaroline, so show them some love and check the whole selection {here}

Wednesday, August 29, 2012

Camera Ready: DIY


A few weeks ago, I decided I wanted to spice up my DSLR and make a camera strap for it. It turned out like this:


Isn’t leopard print always more fun?

Funny enough, as I went to write this post, I received this in my email:

p.s. can we check out the DIY iPhone cover in the corner?!


DIY camera straps seem to be “in” right now!

Here’s how I made the leopard print and pearl strap seen above!

You will need:

1 ¼ yards of cotton webbing
Two swivel latches
Gold & Black craft paint
Embroidery Thread
Beads and Beading thread
2 Small key rings

To Do:

1.     Free-hand paint gold “spots” onto the webbing. Be liberal and relax on the spots. Obvs, it’s animal print so there’s no right or wrong way!


2.     Add smaller black spots on top of and surrounding the gold spots.


3.     After paint has dried, add beads. I randomly added a few here and there to give the camera strap an extra dimension
4.     Loop the swivel latches onto either end, fold over the ends, and stitch with the embroidery floss. Mark an “x” to solidify the closure.


5.     Attach the small key rings to the ends of the camera, clip on the strap, and start shooting! 

Tuesday, August 28, 2012

Treat to Try: Personal Pizzas


This is a super-easy mainly summer go-to in my family as well as with our friends, and has been edited continuously depending on the pizza maker. The dough is pre-made, so really, there is no fuss involved!

My mom makes what we refer to as an “Elm City Special” (New Haven, for those who know what that is referencing…), which is a white sauce, sliced tomatoes, and some full and fresh basil leaves. Another favorite is, as my mom calls it, Salad Pizza a la Claflin. Salad Pizza hails from Jordan’s Pizza in our hometown, and consists of doughy bread cooked with tradish red sauce and then covered in a tossed fresh garden salad. It’s amazing. SP a la C is created with red sauce and cheese and then topped with a garden salad. Both SP’s include Italian dressing in the salad!

My personal favorite, and the one shown below, is a simply olive oil and cheese pie topped with arugula that has been tossed with lemon juice. Noms. Instructions below!

tell me your mouth doesn't water looking at this!


You will need:

Pizza Dough (Our local grocer sells frozen handmade personal pies that you defrost and cook (or grill!), but it tastes equally delish using good old supermarket pre-cooked dough. I know because we’ve made that too!

Olive Oil
Rosemary
Garlic

Whatever cheese you like! (I’ve had Fontina, Parm, Mozz, and dollops of  Goat Cheese all on one pie… yummy!)

Pepperoni
Toppings
Salt & Pepper
Arugula
Lemon Juice


To Do:
1.     Heat olive oil with rosemary and garlic to infuse. Brush on generally onto the pizza dough
2.     Laden the dough with whichever cheese you see fit. For this I used a mix of shredded parmesan and mozzarella, along with slices of fresh mozzarella to beef it up
3.     Add additional toppings, in this case: pepperoni
4.     Sprinkle with a little salt and generous pepper (depending on your tastes!)
5.     Cook pies… Mine literally cooked for five minutes at 450 degrees, but follow the dough instructions!
6.     While pie cooks, toss arugula with lemon juice
7.     Top pie with arugula and add extra S+P if deemed fit… I really love pepper
8.     ENJOY!